Background

Sunday, December 4, 2011

Holiday Card Wreath

It is no surprise that I have become a little lazy about blogging. I have been too wrapped up in other things, including spending too much time on Pinterest and as a result looking at other projects and blogs instead of updating my blog. My goal is to improve on this and try to make more time to update my blog regularly. It also doesn't help working full time and going to school. But enough about my excuses of not blogging, I have however been taking experimenting with DIY projects and recipes....just haven't blogged about any of it. Until now that is....in the spirit of spreading holiday cheer, I am going to share a project I found on Pinterest! I am eager to fill up my wreath with holiday cards :)


Materials:
  • 50 clothespins (just the plain wooden ones)
  • red pony beads
  • spray paint (Emerald Green)
  • wire hanger
  • red ribbon (at least one yard)
  • hot glue gun

Directions:

1. Clip the clothespins along the edge of a box  


 2. In a well ventilated area (or outside) spray paint the clothespins (2-3 coats of paint.) I would also recommend wearing
gloves so that your hands don't turn green :) 


 3. Use a wire cutter to cut the hook end off of a hanger. Shape the hanger in a circular wreath shape.


4. After the clothespins are completely dried, begin stringing the beads and clothespins filling up the wreath.


5. Use a hot glue gun to attach the two ends to the wreath. I used two coats of glue and held it in place while it dried.


6. Attach the ribbon to the top of the wreath where you glued it together. Cut the ribbon the length that you would like the wreath to hang (mine was about 10 inches before looping). With the remaining ribbon make a bow and glue to the wreath


Hang your wreath and begin eagerly waiting for your holiday cards to arrive in the mail! :)

Thursday, October 6, 2011

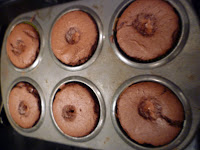
Paleo Carrot Cake Muffins

 Mmm...I came across this blog and recipe in my obsession on Pinterest. Over the last month, I have been wanting to be more adventurous with my baking Paleo treats. Although this recipe doesn't call for coconut flour, I experimented with making my own coconut flour by grinding coconut flakes into a powder (I made coconut shrimp from Everyday Paleo....delish). Anyways back to the carrot muffins. I love it when I have all of the ingredients on hand and I needed to use my carrots and an extra ripe banana so this recipe was great for me. The recipe only makes between 12 and 15 muffins and they disappeared rather quickly. I got suggestions that raisins would be a great addition to the muffins. I am excited to try out more Paleo baking treats :)


Ingredients: 
1 1/2 cups almond flour1/4 teaspoon salt
1/2 teaspoon baking soda
1/2 tablespoon cinnamon/pumpkin pie spice
3 eggs
2 tablespoons coconut oil
1 ripe banana, mashed
2 tablespoons honey
1 1/2 cups carrots, grated
1/2 cup pecans, chopped


Directions:
1. Combine dry ingredients (almond flour, salt, cinnamon, and baking soda ) In a separate bowl, combine wet ingredients (eggs, banana, oil, and honey).

2. Add the carrots to the wet ingredients and be sure that everything is thoroughly mixed.

3. Combine the wet and dry ingredients and mix all ingredients with a mixer (Oh how I LOVE my Kitchen Aid)

4. Using a 1/4 cup measuring cup,  scoop batter into lined cupcake pan and sprinkle with cinnamon or pumpkin pie spice (my absolute favorite ingredient)


5. Bake in a 325 degree oven for 20-25 minutes. Let cool for 5-10 minutes.
Enjoy :)

Saturday, October 1, 2011

No Bake Paleo Cookies


 Surprise! Surprise! I was browsing around on Pinterest and found these delicious looking cookies!!  It looked easy enough and the ingredients seemed tasty.  I finally had the chance to try them out today and they are definitely just as good as they look! It was nice that they were "no-bake" because it has still been pretty darn hot lately and the last thing I wanted was to have my oven on in the middle of the afternoon. I was a little unsure about the olive oil in the cookies but I went ahead with following the recipe as it was the first time. Later I did read some of the comments on the original recipe that also suggested using half olive oil and half coconut oil and using other types of nuts, so maybe next time I will experiment with the ingredients a little more.


No Bake Paleo Cookies

Ingredients:
  • 1 cup coconut flakes
  • 1 cup chocolate chips
  • 1 cup chopped pecans
  • 1/2 cup almond butter
  • 1/3 cup honey
  • 1/3 cup olive oil
  • 1 Tablespoon cinnamon


Directions:


1. Heat chocolate chips, oil, honey, and almond butter in a sauce pan on medium heat. Melt the chocolate chips until they are a smooth consistency.  


2. Turn off the heat and add cinnamon, nuts and coconut. Be sure to coat everything in the chocolate.


3. Drop a spoonful on a parchment lined cookie sheet. Refrigerate for at least 30 minutes or until hardened.


Enjoy :)


Saturday, September 24, 2011

Paleo Comfort Foods

Yay! I have been eagerly waiting for my cookbook to be here and it finally arrived this week! I have been checking out the Paleo Comfort Foods blog for a few months now and have absolutely loved their flavorful recipes and easy going spirit. I also like all of the giveaways they have had lately (even though I have yet to win)! Either way I am super excited to have my cookbook in my hands now and have been looking through the book and can't decide what recipe to experiment with first! All of them seem pretty simple to make and most of the ingredients are things I try to keep around anyway. So keep looking for my Paleo Comfort Food cooking adventures in the upcoming weeks :)

Sunday, September 18, 2011

Paleo Chocolate Chip Orange Scones

I have been spending way too much time on Pinterest. It is an easy way to distract myself from all of the other work that I should be doing. It has been a stressful start to the new school year. However, I have been thoroughly enjoying the weekends to experiment with different arts and crafts projects and recipe adventures I have found from Pinterest. This weekend I made two delicious recipes from Elana's Pantry. If you haven't checked her out, she has some amazing gluten free recipes. I stumbled upon her blog earlier this summer, but didn't make anything until this weekend. I don't know why it took me so long because both recipes I made this weekend were super easy and amazing, I even had all of the ingredients at home already. I made the Paleo Bread yesterday (I will be experimenting on different variations soon and most likely sharing those later) and this morning I made these scones.

Paleo Orange Chocolate Chip Scones

Ingredients:
  • 2 cups almond flour/meal (the recipe called for blanched almond flour, however I mixed  it half and half with regular almond meal and blanched almond flour)
  • ¾ teaspoon baking soda
  • ½ cup dark chocolate chips 
  • 1 tablespoon orange zest
  • 1 egg
  • 3 tablespoons agave nectar


Directions:
1. Mix dry ingredients (almond flour,  baking soda, chocolate chips, orange zest) in large bowl.
2. Mix egg and agave together and combine with dry ingredients.
3. Knead the dough with your hands to create a ball (My dough was very sticky). Flatten the dough to about ½ inch thick circle.
4. Cut the dough into mini pizza slices and transfer to a parchment lined baking sheet.
5. Bake for 10-15 minutes in a 350 degree oven.
Step 3
Step 4

Enjoy :)

Friday, September 9, 2011

Chocalate Peanut Butter Cupcakes

Do you love chocolate and peanut butter? If so...these cupcakes are amazing and I can almost guarantee that you will love this "sweet treat"! I found this recipe on Pinterest and knew that I needed to try them out ASAP. Of course when my sisters birthday came around, I jumped on the chance to make them. I love being able to use a packaged cake mix and doctor it to make it better. I was rushed to make the cupcakes that I didn't have a chance to take my step by step tutorials. I also hope I can start making more time to share all of my craft adventures :)

Cupcakes
1 package devil’s food cake mix
1 (3.4 oz) package instant chocolate pudding mix
3/4 cup sour cream
1 cup vegetable oil
4 eggs
2 tsp pure vanilla extract
Reese’s Miniatures peanut butter cups, frozen (you will need one for each cupcake)

Peanut Butter Buttercream Icing
3 sticks unsalted butter, softened
1 cup creamy peanut butter
2 Tbsp pure vanilla extract
2 lbs powdered sugar
3-4 Tbsp milk (I used Almond Milk because that is what I had on hand but you can use regular milk too)
Reese's peanut butter cups miniatures
 

Directions:

Cupcakes
Fresh out of the oven :)
1. Preheat oven to 350 degrees F. Line cupcake pan with liners and set aside.
2. Mix all ingredients except for peanut butter cups until well mixed.
3. Spoon 3 to 4 tablespoons batter in the cupcakes liners Place a frozen peanut butter cup in the batter.
4. Bake for 18-22 minutes until toothpick comes out clean. 
5. Allow to cupcakes to cool completely before frosting.  

Peanut Butter Buttercream Frosting
1. Mix butter and peanut butter in a stand mixer.
2. Add the powdered sugar carefully (in small amounts) until well mixed. 
3. Add the milk and vanilla. Be sure that all of the frosting is being mixed. Keep mixing for 5 to 7 minutes until desired frosting consistency. 
4. Use a round tip or star tip in a decorator bag to pip frosting onto cooled cupcakes. Top each cupcake with a mini peanut butter cup. 


Enjoy :)


    Friday, August 26, 2011

    MIA

    So yeah....I've been super busy these last couple weeks with school starting so my extra time has been occupied by sleeping, planning, reading, and Pinteresting :) I am hopefully going to be able to relax a little once I get into the groove of school! So needless to see there really hasn't been much cooking around here or crafting....that is until tonight! Tomorrow is my sisters birthday (WOOT WOOT) and I was given the task of making SWEET TREATS! I have been looking on Pinterest all week trying to figure out what kind of cupcakes to make! I will give you a little sneak peak and share more about them tomorrow when they are finished. I have also been working on a few crafts that I will share as well :)

    Sunday, August 14, 2011

    Mod Podge Letter


    I have discovered Mod Podge!!!! I have spent way too much time on Pinterest lately looking at all sorts of crafts and recipes. I kept seeing projects with Mod Podge and I had never used or really heard of it before! The more I looked into everything you can make with it...I knew I had to get some ASAP! I decided to make a "Mod Podged S" for my first project. I forgot to take pictures along the way but have no fear, I am pretty sure there will be more Mod Podge tutorials because this stuff is amazing! I love it!

    I bought a plain, unfinished wooden "S" and painted the sides and back a pretty green color so it would match the colors in my house and because I didn't want the unfinished wood to show. After letting it dry, I traced the "S" onto a piece of scrapbook paper and cut out the letter. After putting on a layer of Mod Podge on the wood, I carefully placed the paper to it and then applied another layer of Mod Podge over the paper. I did another layer on top after it dried because I think I missed a few spots the first time :) I am super excited to experiment with more projects in the very near future! I put my Mod Podged S in my kitchen above my key hooks!

    Saturday, August 13, 2011

    Homemade Mint Chocolate Chip Ice Cream


    As I have said before...ice cream is my weakness! I love it! One of my favorite flavors has to be Mint Chocolate Chip (especially the Breyer's Mint Chocolate Chip...mmm)! When I discovered the super easy homemade-no machine ice cream recipe last month, I knew that I absolutely needed to make a mint ice cream. I knew that if I made it on my own, I would most likely end up eating the entire batch by myself! I had the perfect excuse to make it for a little get together last weekend! I also made another batch of my Chocolate, Coffee, Toffee Ice Cream too! I just love how simple the ingredients are and that you don't need any fancy machines!

    Homemade Mint Chocolate Chip Ice Cream

    Whip up Pint of Heavy Cream until stiff peaks. Mix 1 teaspoon vanilla extract and 1 1/2 teaspoon peppermint extract with the can of Sweetened Condensed Milk. Combine the whipped heavy cream and milk mixture together. Add 1 cup mini chocolate chips to the ice cream (you can use more or less chocolate chips/mint depending on how minty or chippy you want your ice cream). Pour the ice cream into a freezer safe bowl and freeze for at least 4 hours or until hardened. 
    Enjoy every bite of this delicious ice cream!!!!


    Saturday, August 6, 2011

    Melted Crayon Art


    School starts soon so I have been trying to cram in all of the projects I wanted to do this summer into the last few days left. I have been busy organizing, cleaning, and catching up on all of my TV watching :) I also discovered Pinterest! If you haven't heard of it, you need to check it out! It is pretty much an online bookmarking site that you can share anything you stumble up on the internet with others. I have spent lots of time looking at all of the wonderful things that everyone has to offer online. It is amazing how much is out there! One of the things in my house that I need is more artwork on the walls....so I have been on the lookout for more DIY art! I found this project on there yesterday and I couldn't wait to get to the store and buy canvas and crayons!
        
    Materials: 
     

         11 X 14 Canvas
        2 Boxes of 24 Crayons
        Hot Glue Gun
        Hair Dryer


    Directions : 
     1. Lay out the crayons in any order you want. I took out the white, gray, peach, brown, and black. With the remainder of the crayons I was able to fit all of them across the canvas in a rainbow effect.

    2. Glue crayons next to each other towards the top of the canvas. I glued each crayon individually to be sure they were as straight as possible.
     3. Once all of the crayons are glued down, take the canvas outside and lean against a wall with newspaper down to protect the ground. I just love the look of all of the crayons lined up

    4. Use a blow dryer on HIGH heat and melt the crayon wax and let the wax drip and blend the colors together. I did have to change the angle of the canvas to help control the drips.

     I just love the look of the final product! I can't wait put the canvas in a frame to put in my arts and crafts room/office. The colors look amazing together and you can't help but smile when you look at it :) This is definitely a project a recommend if you are looking for a fun way to brighten a room!

    Thursday, July 28, 2011

    Homemade Strawberry (Dairy-Free/No Machine) Ice Cream

    I made another dairy free ice cream over the weekend that I thought I would share (share the recipe that is...since I pretty much ate all of it by myself:) ) Like I mentioned before, it is great to keep frozen sliced bananas in the freezer because making this ice cream is a nice treat to have, especially when it has been sooo hot lately!  I am so glad that I stumbled upon this easy way to make dairy free, no machine ice cream. I am loving all of the possible flavor combinations you can make! Hope you enjoy :)

    Strawberry (Dairy-Free/No Machine) Ice Cream

    I used 3 frozen Bananas and mixed in about 2-3 Tablespoons Pecans, 1 teaspoon Vanilla Extract, 1 teaspoon Cinnamon, and 1/4 cup Coconut Milk in the food processor. After it was a smooth consistency, I transferred the ice cream to a large bowl and add in 4-5 chopped frozen strawberries. I put mine in the freezer for a little bit to harden.  I used coconut flakes as a garnish :)

    Monday, July 25, 2011

    Spaghetti Squash

         I love trying out new foods! I remember having spaghetti squash on occasion growing up, but I have never made it myself. It is a great replacement for pasta noodles and tastes delicious! It is realllly easy to make and I also didn't realize how many "noodles" one squash produces! I think the hardest part was getting the knife through the squash. A couple weeks ago my sister and I both cut ourselves with kitchen utensils within 24 hours so I was still a little afraid of sharp objects in the kitchen...but I was able to slice through this squash without injury :)
         Instead of making a marinara sauce I was able to use leftovers from my ratatouille from the night before. It was scrumptious!! I am excited to go out and buy another squash again soon and try out other toppings. I think a little butter, chopped basil, and a tomatoes would be delish!

    Directions:
    1. Slice off one end of squash to make it easier to stand up
    2. Slice through squash lengthwise. Use a sharp chefs knife....be careful!
    3. Scoop out the seeds and insides of both halves
    4. Place in a lightly greased (I used olive oil spray) baking dish and poke with a fork
    5. Bake in a 350 degree oven for 30-40 minutes or until soft
    6. Use a fork to scrap out the "noodles"

    I topped mine with my ratatouille :)
    Enjoy :)

    Friday, July 22, 2011

    Ratatouille

    source
    The first time I tried ratatouille was at a little French restaurant wrapped in a crepe. It was amazing! I loved all of the flavors and it was pretty much all of my favorite vegetables all mixed together.  I went home and had to recreate my new favorite dish hehhehe! I even learned to make crepes and stuffed them with the veggies. This time around, I just made ratatouille on its own with grilled sausage. During the summer I usually have all of the ingredients on hand, so it makes a great dinner when I don't plan what to eat ahead of time :) It is actual really easy to make, the hardest part is getting all of the vegetables cut, but then all you have to do is put them together to mingle their flavors and cook in a large pan. I even used the leftovers with dinner the next night...stay tuned for that one :)

    Ratatouille

    Ingredients
    • 1 eggplant, diced
    • 2 zucchini, diced
    • 1 yellow squash, diced
    •  8-10 mini yellow, orange, and red peppers (or 2 whole peppers)
    • 1/2 onion, diced
    • 3 garlic cloves, diced
    • handful of basil, chopped
    • large can of diced tomatoes
    • 2 bay leaves
    Directions:
    1. Cook onions and garlic until translucent
    2. Add in peppers, squash, eggplant, basil, bay leaves and tomatoes
    3. Cook on medium low heat for 20-30 minutes, covered


    Monday, July 18, 2011

    ...We all scream for ICE CREAM

    This is round 2 of my ice cream experimentation. After making my super easy creamy ice cream, I wanted to find a Paleo ice cream that was just as easy to make, dairy free, low sugar, and that didn't need a machine. I found a couple of sites with different variations, but these recipes seemed to be the best. The result definitely isn't as rich and creamy as the first ice cream, but it is very refreshing.  Again, there are many "add-ins" and flavors you can experiment with. The frozen bananas are what give it the ice cream consistency. So now I want to start keeping frozen, sliced bananas in the freezer for when I am craving ice cream.  I made a chocolate, almond butter, and toffee ice cream that was delicious! Hope you are enjoying National Ice Cream Month :)

    Ingredients: 


     Directions: